Creating a Facebook pixel might not be as easy as it seems to appear. Here we will try to see ways of creating a Facebook pixel and then adding its base code to your website’s pages. Later on, we will add the event code to some your website’s pages and then confirm if that pixel is implemented the way it is supposed to be.
Now, let’s get down to work, and we will begin by creating your Facebook pixel.
To do this, you will need to go straight to your Facebook pixel tab that is found in the Ads Manager. After that click the option for Create a Pixel, after which you will be asked to key in the name of your pixel. Each Ad account can only have one pixel, so it will be good to select a name that is an accurate representation of your business. If you wish to alter the pixel’s name, then you can do that later from the tab of Facebook pixel.
There are terms in some displayed box that you will be asked to accept, and then click the tab for Create Pixel.
It is also important to note that those with older versions of a Facebook pixel will not be able to see the option for creating another possibly because they had previously created a Custom Audience pixel in the past. But in this particular case, it is advisable to update to the code for Facebook pixel base and then add its event codes so that you can be able to access every product that can assist your business.
 In the Ads Manager, look for the Pixels page. Click on the tab written Actions and then View Code. After successfully doing that, you can copy the base code and then paste it somewhere between the “head” that is available on every web page. You can also do it in your website template so that you can later install it on your whole website.
Events, on the other hand, can be described as certain actions that occur on your website that might have been caused by the paid Facebook ads, or the free or unpaid organic reach. The primary duty of the event code is to allow you track those actions so that you can grip them in advertising. Events that can be quickly sent come in two main types, the standard events, and the custom events.
The standard events are nine, that can be easily tracked and optimize your ads without any extra actions.
In the Ads Manager, look for the Pixels page. Click on the tab written Actions and then View Code. After successfully doing that, you can copy the base code and then paste it somewhere between the “head” that is available on every web page. You can also do it in your website template so that you can later install it on your whole website.
Events, on the other hand, can be described as certain actions that occur on your website that might have been caused by the paid Facebook ads, or the free or unpaid organic reach. The primary duty of the event code is to allow you track those actions so that you can grip them in advertising. Events that can be quickly sent come in two main types, the standard events, and the custom events.
The standard events are nine, that can be easily tracked and optimize your ads without any extra actions.
 For your website’s original code, all you will have to do is to paste the pixel code for Facebook that is available between the
<head> and </head> tags at your website’s page. If you already have some other codes amidst the head tags, then you can just drop the pixel tab below that, but above the.
For Your standard event code, tag and paste the standard event code right within the Facebook pixel code. You will complete the registration process then add it to the cart. This should be done for all pages that you think of tracking.
What is supposed to be carefully observed is that all pages in your website have the base code while the standard event code can be present in different pages.
Custom events are actions that are very crucial to your business, but unfortunately, can’t be used for optimization and tracking without some extra action.
Using custom events is not so complicated.First of all, you will need to add the Facebook pixel code to the page of your website, and this is how you will do that.
Access the Ads Manager and then go to your Facebook pixel tab. After that, you can click actions and then view the pixel code. Highlight it by clicking the code. Having done that, you can then select Copy by right clicking, or you can still use Ctrl+C/Cmd+C to do it.
After you have done all that, you can then click Done, then head straight to your website’s HTML and then paste the code.
To make sure that the code is in an excellent position of tracking across your whole site, you can place it in the header tags your site’s HTML.
How To Add The Event Code To Your Website’s Pages
Events code is quite imperative because it shows the major steps that are essential to the objective of your business. This is how you can easily get the event code added to your website,
For your website’s original code, all you will have to do is to paste the pixel code for Facebook that is available between the
<head> and </head> tags at your website’s page. If you already have some other codes amidst the head tags, then you can just drop the pixel tab below that, but above the.
For Your standard event code, tag and paste the standard event code right within the Facebook pixel code. You will complete the registration process then add it to the cart. This should be done for all pages that you think of tracking.
What is supposed to be carefully observed is that all pages in your website have the base code while the standard event code can be present in different pages.
Custom events are actions that are very crucial to your business, but unfortunately, can’t be used for optimization and tracking without some extra action.
Using custom events is not so complicated.First of all, you will need to add the Facebook pixel code to the page of your website, and this is how you will do that.
Access the Ads Manager and then go to your Facebook pixel tab. After that, you can click actions and then view the pixel code. Highlight it by clicking the code. Having done that, you can then select Copy by right clicking, or you can still use Ctrl+C/Cmd+C to do it.
After you have done all that, you can then click Done, then head straight to your website’s HTML and then paste the code.
To make sure that the code is in an excellent position of tracking across your whole site, you can place it in the header tags your site’s HTML.
How To Add The Event Code To Your Website’s Pages
Events code is quite imperative because it shows the major steps that are essential to the objective of your business. This is how you can easily get the event code added to your website,
 Click on the tab for your Facebook pixel page that is in Ads Manager. After that, go ahead and click Create Conversion followed by Track Conversions With Standard Events.
What you should do next is to copy the Event Code of the events that you feel are important to you.
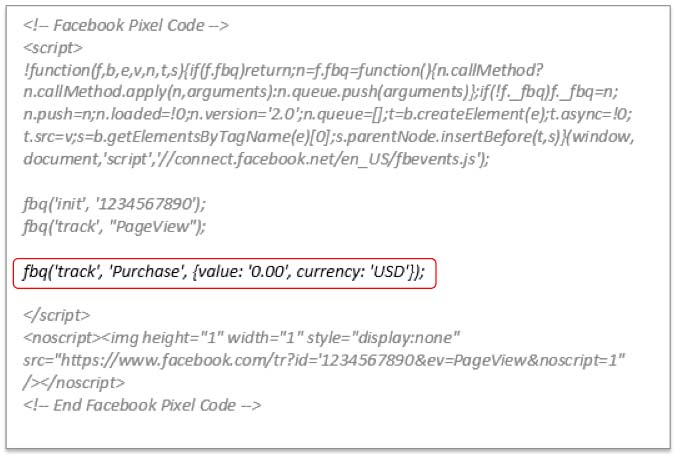
The next step would be access your website’s code, and then put the event code on the corresponding pages. It’s advisable to carry out this by adding the event code between script tags in separate manners. The pixel base code should not be modified.
To enable you to reflect on all the important purchase actions, then you can add a full funnel of events, and these would include AddToCart, ViewContent, and Purchase.
Click on the tab for your Facebook pixel page that is in Ads Manager. After that, go ahead and click Create Conversion followed by Track Conversions With Standard Events.
What you should do next is to copy the Event Code of the events that you feel are important to you.
The next step would be access your website’s code, and then put the event code on the corresponding pages. It’s advisable to carry out this by adding the event code between script tags in separate manners. The pixel base code should not be modified.
To enable you to reflect on all the important purchase actions, then you can add a full funnel of events, and these would include AddToCart, ViewContent, and Purchase.
 Another thing that might be of some importance is to ensure that you add to the nine standard events that have been discussed in the exceptional pages of your website that you wish to optimize and track your ads for. An instance is if you are making a sale for a particular product where you will be required to put standard event codes for your purchase page and add-to-cart page. All you will have to do is to copy and paste all the things in the column for standard event column and then add it to your website’s page where you would want this action tracked.
After all that, it will be good to now confirm if the Facebook pixel you have installed is working properly. One tool that is capable of assisting you checking whether your Facebook pixel is operating in a proper way is the Facebook Pixel Helper.
This is what you will do after installing the Facebook pixel on your website.
Access the website page that the pixel was put on, the pixel will be able to send a notification to Facebook if it is working, and from there you will be in a position to view activity in the Facebook Pixel Page that is available in your Ads Manager. Also, note that the status for your pixel will be set to Active.
There is a major graph on the Facebook page that will display the total pixel traffic over a period of time, and from there you will be able to tell if the data is approximately where you would want it to be. It should be an accurate reflection of your overall website analytics reporting.
Having checked all your pixel fires, it is very important to make sure that all your events are reported in the right way.
Another thing that might be of some importance is to ensure that you add to the nine standard events that have been discussed in the exceptional pages of your website that you wish to optimize and track your ads for. An instance is if you are making a sale for a particular product where you will be required to put standard event codes for your purchase page and add-to-cart page. All you will have to do is to copy and paste all the things in the column for standard event column and then add it to your website’s page where you would want this action tracked.
After all that, it will be good to now confirm if the Facebook pixel you have installed is working properly. One tool that is capable of assisting you checking whether your Facebook pixel is operating in a proper way is the Facebook Pixel Helper.
This is what you will do after installing the Facebook pixel on your website.
Access the website page that the pixel was put on, the pixel will be able to send a notification to Facebook if it is working, and from there you will be in a position to view activity in the Facebook Pixel Page that is available in your Ads Manager. Also, note that the status for your pixel will be set to Active.
There is a major graph on the Facebook page that will display the total pixel traffic over a period of time, and from there you will be able to tell if the data is approximately where you would want it to be. It should be an accurate reflection of your overall website analytics reporting.
Having checked all your pixel fires, it is very important to make sure that all your events are reported in the right way.
 These events are very case-sensitive, so if by mistake you added fbq, which is track’,’viewcontent’; to your website pages instead of the right one which is fbq (‘track’,’ViewContent’); then you will be able to view an event called viewccontent displays in the events tab. When that happens, you will be able to edit your pixel code on the same page so that you can replace the wrong code with the right standard event code.
Troubleshooting Event Implementation And Pixel
You can only troubleshoot application problems after you have downloaded the Facebook Pixel Helper. Once it is installed, you will see a small icon displayed right next to your address bar.
There is a pop up that will be able to tell all the pixels or events that were found on the page, and if they loaded in the right way.
Pixel Helper might display errors or warnings on most of your pages that can be easily solved. You will be required to check the HTML code on the web page that you got the error from. That is how you will be able to fix most of these Pixel Helper errors.
Checking the HTML code is quite easy, all you will have to do is to go to the favorite webpage and then right click on the screen then choose inspect and browse for your pixel ID.
Troubleshooting Your Ad Performance
You can also troubleshoot the performances of your ad to ensure that everything runs in the right way. You will be required to customize your columns for Ad reporting so that you can accurately track ad performance especially while using Facebook pixel. The results column for a site conversion campaign will show all the events and conversions associated with your ad. This is done automatically. In the case where you have AddToCart,
ViewContent and Purchase events at your site, the aggregate number of these events will be shown, and the cost column will also demonstrate the cost per the total number of all these events.
Conclude by running your campaigns by going to ad creation and the selecting the option for Increase conversions on your website and then click continue. Select a conversion event and then create your campaign.
You can then place an order, and use your Facebook pixel.
These events are very case-sensitive, so if by mistake you added fbq, which is track’,’viewcontent’; to your website pages instead of the right one which is fbq (‘track’,’ViewContent’); then you will be able to view an event called viewccontent displays in the events tab. When that happens, you will be able to edit your pixel code on the same page so that you can replace the wrong code with the right standard event code.
Troubleshooting Event Implementation And Pixel
You can only troubleshoot application problems after you have downloaded the Facebook Pixel Helper. Once it is installed, you will see a small icon displayed right next to your address bar.
There is a pop up that will be able to tell all the pixels or events that were found on the page, and if they loaded in the right way.
Pixel Helper might display errors or warnings on most of your pages that can be easily solved. You will be required to check the HTML code on the web page that you got the error from. That is how you will be able to fix most of these Pixel Helper errors.
Checking the HTML code is quite easy, all you will have to do is to go to the favorite webpage and then right click on the screen then choose inspect and browse for your pixel ID.
Troubleshooting Your Ad Performance
You can also troubleshoot the performances of your ad to ensure that everything runs in the right way. You will be required to customize your columns for Ad reporting so that you can accurately track ad performance especially while using Facebook pixel. The results column for a site conversion campaign will show all the events and conversions associated with your ad. This is done automatically. In the case where you have AddToCart,
ViewContent and Purchase events at your site, the aggregate number of these events will be shown, and the cost column will also demonstrate the cost per the total number of all these events.
Conclude by running your campaigns by going to ad creation and the selecting the option for Increase conversions on your website and then click continue. Select a conversion event and then create your campaign.
You can then place an order, and use your Facebook pixel.
What Is Facebook Pixel Code?
It is composed of two major elements, which are the pixel base code, and the event code. The main duty of pixel base code is to track activities that are available on your website and in that offering a touchstone for measuring some events. Every page of your website should have the base code installed in them, and doing that is quite simple. This is how you will go about it,
For your website’s original code, all you will have to do is to paste the pixel code for Facebook that is available between the
<head> and </head> tags at your website’s page. If you already have some other codes amidst the head tags, then you can just drop the pixel tab below that, but above the.
For Your standard event code, tag and paste the standard event code right within the Facebook pixel code. You will complete the registration process then add it to the cart. This should be done for all pages that you think of tracking.
What is supposed to be carefully observed is that all pages in your website have the base code while the standard event code can be present in different pages.
Custom events are actions that are very crucial to your business, but unfortunately, can’t be used for optimization and tracking without some extra action.
Using custom events is not so complicated.First of all, you will need to add the Facebook pixel code to the page of your website, and this is how you will do that.
Access the Ads Manager and then go to your Facebook pixel tab. After that, you can click actions and then view the pixel code. Highlight it by clicking the code. Having done that, you can then select Copy by right clicking, or you can still use Ctrl+C/Cmd+C to do it.
After you have done all that, you can then click Done, then head straight to your website’s HTML and then paste the code.
To make sure that the code is in an excellent position of tracking across your whole site, you can place it in the header tags your site’s HTML.
How To Add The Event Code To Your Website’s Pages
Events code is quite imperative because it shows the major steps that are essential to the objective of your business. This is how you can easily get the event code added to your website,
Click on the tab for your Facebook pixel page that is in Ads Manager. After that, go ahead and click Create Conversion followed by Track Conversions With Standard Events.
What you should do next is to copy the Event Code of the events that you feel are important to you.
The next step would be access your website’s code, and then put the event code on the corresponding pages. It’s advisable to carry out this by adding the event code between script tags in separate manners. The pixel base code should not be modified.
To enable you to reflect on all the important purchase actions, then you can add a full funnel of events, and these would include AddToCart, ViewContent, and Purchase.
These events are very case-sensitive, so if by mistake you added fbq, which is track’,’viewcontent’; to your website pages instead of the right one which is fbq (‘track’,’ViewContent’); then you will be able to view an event called viewccontent displays in the events tab. When that happens, you will be able to edit your pixel code on the same page so that you can replace the wrong code with the right standard event code.
Troubleshooting Event Implementation And Pixel
You can only troubleshoot application problems after you have downloaded the Facebook Pixel Helper. Once it is installed, you will see a small icon displayed right next to your address bar.
There is a pop up that will be able to tell all the pixels or events that were found on the page, and if they loaded in the right way.
Pixel Helper might display errors or warnings on most of your pages that can be easily solved. You will be required to check the HTML code on the web page that you got the error from. That is how you will be able to fix most of these Pixel Helper errors.
Checking the HTML code is quite easy, all you will have to do is to go to the favorite webpage and then right click on the screen then choose inspect and browse for your pixel ID.
Troubleshooting Your Ad Performance
You can also troubleshoot the performances of your ad to ensure that everything runs in the right way. You will be required to customize your columns for Ad reporting so that you can accurately track ad performance especially while using Facebook pixel. The results column for a site conversion campaign will show all the events and conversions associated with your ad. This is done automatically. In the case where you have AddToCart,
ViewContent and Purchase events at your site, the aggregate number of these events will be shown, and the cost column will also demonstrate the cost per the total number of all these events.
Conclude by running your campaigns by going to ad creation and the selecting the option for Increase conversions on your website and then click continue. Select a conversion event and then create your campaign.
You can then place an order, and use your Facebook pixel.